An introductory as well as a wiki page to High Performance Computing Clusters for users from University of Applied Sciences Esslingen, also known as Hochschule Esslingen (HE).
HE academic researchers are provided with direct access to bwGriD and bwUniCluster platforms, free of charge, in order to run any non commercial calculations or simulations.
Each cluster has its own infrastructure and uses cluster specific resource managment tools, software packages, libraries, development tools, etc. An user may have to adjust the work procedures for each cluster accordingly.
Note: after you choose the cluster, in the upper right corner you'll get a cluster specific navigation menu, for cluster specific wiki sections.
bwUniCluster 2.0
As part of bwHPC project, bwUniCluster is a modern system which consists of more than 840 SMP nodes with 64-bit Intel Xeon processors, providing access to users from multiple universities of Baden-Württemberg.
Each node on the cluster has at least two Intel Xeon processor, local memory from 96GB to 3TB, local SSD disks, network adapters and optionally accelerators (NVIDIA Tesla V100). All nodes are connected over a fast InfiniBand interconnect and also connected to an external file system based on Lustre.
More info about hardware and architecture you may find here.
Workload manager: SLURM.
bwGRiD Esslingen (no longer active)
The Baden-Württemberg Grid (bwGRiD) was part of the D-Grid initiative and provided more than 12,000 cores for research and science at 8 locations in Baden-Württemberg. Participating partners were the Universities of Freiburg, Heidelberg, Tübingen, Mannheim and the Ulm/Konstanz network, the Esslingen University of Applied Sciences, the Karlsruhe Institute of Technology and the High Performance Computing Centre (HLRS) in Stuttgart.
A NEC LX-2400 cluster, it is an old project with an outdated hardware, access to which is still granted for HE users. Currently it has about 75 Nodes with Intel Nehalem processors with 2.27GHz and 2.8GHz with 8 cores each and 22 Nodes with 32 virtual cores, totaling in about 1264 active cores. Each node has 24GB and 64GB memory respectively. All systems are without local hard disk.
The file system used is the NEC LXFS with 36 TB, a high-performance parallel file syastem based on Lustre.
Each blade is connected to the local network with Gigabit Ethernet. This network is used for administration and for logging on to the systems. Each blade has a QDR InfiniBand interface (transfer rate: 40 GBit/Sec) for the transfer of data and results of calculations. The InfiniBand network is designed as a HyperCube with a total of 192 edge ports. Both the data exchange of parallel programs and the connection to the NEC LXFS are carried out via InfiniBand.
Workload manager is a combination between MOAB-TORQUE and PBS.
Disclaimer
These systems are not designed to collect and backup any data. Therefore, it is highly recommended not to store any data you are not afraid to lose on the clusters.
Enter your bwidm password and OTP MobaXterm will ask you to save your password. You may agree to this.
You are connected via sftp.
In MobaXterm, the file system of your own PC and that of the cluster are displayed side by side. Data can be copied by drag and drop.
File Systems
In addition to high-performance computing resources, the bwUniCluster hardware architecture includes a parallel hardware Lustre file system that is connected to the computing nodes via a high-end InfiniBand fiber-optic network.
As a result, not all data is securely backed up or stored on the cluster. And you, the user, have to decide how best to store your data to take full advantage of the parallel file system or the backup capabilities of the cluster.
The following data storage systems are offered on the cluster with some recommendations:
$HOME folder - suitable for permanently required data. The user can access this folder from all cluster nodes and a regular backup of the data in this folder is carried out automatically. But it has a qouta limit. It is therfore recomended, that you keep in the $HOME directory the files that you regularly use. Like for example, configuration files, source code, executable programs, etc.
The default limit quota for the $HOME directory, on the cluster is 1 TiB and 10 million inodes (files or folders) per user. To check the current quota usage and limit, use the command:
lfs quota -uh $(whoami) $HOME
In addition to the quota limit per user, there is a limit per university, which is based on the financial share of the universities for the bwUniCluster. The following command will show your this quota:
Workspaces - a parallel file system designed for parallel data access and high throughput of large files. It is able to provide parallel data access with transfer rates of up to 54 GB/s for writing and reading. It is perfectly designed for storing large, non-permanent data sets, e.g. restarting files or output data that have to be post-processed.
Workspaces have a lifetime, and when it expires, the data on it is permanently removed. The maximum lifespan of a workspace is 60 days, but it can be extended three times at the end of this period for a maximum of 240 days after the workspace is created. If a workspace accidentally expires, the data can still be restored for a limited time (a few weeks). In this case you should create a new workspace and state the name of the new and the expired one in a ticket or by e-mail to the bwUniCluster hotline.
You can find more information about creating and managing workspaces here.
$TMP folder - a local node directory on bwUniCluster. While all tasks of a parallel application access the same $HOME and Workspace directory, the $TMP directory is only local to the specific node on the cluster. Different tasks of a parallel application may and should use different directories in a multi-node run. This is exactly the folder that should be used for temporary files accessed by individual tasks. All nodes have fast SSDs local storage devices that are used to store data in $TMP.
You can always find detailed information on file systems on the official wiki page of bwUniCluster.
Job submittion queues (partitions)
As a general purpose type of cluster, bwUniCluster offers a platform for a multitude of jobs which may differ in the required compute resources, such as needed processing CPU power, quantity of RAM, GPU power, (wall-) time etc.
For better allocation of hardware resources to specific jobs, a queue partitioning system is offerd to the user, which have to assign his jobs manually to the specific queue (aka partition).
The job can be asigned to a specific queue with the command sbatch -p queue_name or in a script through #SBATCH --partition=queue_name option.
Note: The specification of a queue is obligatory on bwUniCluster!
Queue name
Node
Default resources
Minimum resources
Maximum resources
dev_single
thin
time=00:10:00, mem-per-cpu=1125mb
time=00:30:00, nodes=1, mem=180000mb,ntasks-per-node=40, (threads-per-core=2) 6 nodes are reserved for this queue. Only for development, i.e. debugging or performance optimization ...
time=00:30:00, nodes=4, mem=90000mb, ntasks-per-node=40, (threads-per-code=2) 8 nodes are reserved for this queue. Only for development, i.e. debugging or performance optimization ...
time=30, nodes=8, mem=249600mb, ntasks-per-node=64, (threads-per-core=2) 8 nodes are reserved for this queue. Only for development, i.e. debugging or performance optimization ...
time=30, nodes=1, mem=376000, ntasks-per-node=40, (threads-per-core=2) 1 node is reserved for this queue. Only for development, i.e. debugging or performance optimization ...
sbatch - a linux command to submit a batch script to Slurm workload manager which allocates nodes to the users. The batch script may be given to sbatch through a file name on the command line or directly into standart input.
sbatch will read any options in the batch script's which start with prefix #SBATCH.
sbatch will create a job reading the batch script and allocate resources accordingly. The resources though won't be granted immediately, the job may sit in a pending queue till its required resources become available.
Example using sbatch
Let's say you want to run a script wich will echo "Hello world!" on 2 processors using mpirun.
Here is an example of such a script, named hello.sh:
#!/usr/env/bin bash
mpirun -n 2 echo "Hello, world!"
To run this script on bwUniCluster, you must first provide some #SBATCH options. Such as:
Number of nodes to allocate. In this case in need 1: #SBATCH --nodes=1
Number of cpus. In this case 2: #SBATCH --ntasks-per-node=2
Queue or partition name on the cluster: #SBATCH --partition=single
Maximum runtime in DD:HH:MM:SS. In this case 1 minute is enough: #SBATCH --time=1:00
Where module load loads the required software to run your mpirun programm.
Now, to submit your hello.sh script to the cluster job scheduler you may run, from the folder hello.sh is located:
sbatch hello.sh
sbatch optiopns
Script prefix are options you may include in your script header
These options may be provided directly in the command line after sbatch command. You use the same options mentioned in the header without #SBATCH prefix.
sbatch --time=1:00 --partition=single hello.sh
Script header options
Purpose
#SBATCH --partition=queue-name
Name of the queue for resource allocation. It is mandatory to set the right queue name
#SBATCH --time=time
Maximum time limit in format DD:HH:MM:SS
#SBATCH --nodes=number
Number of nodes to allocate
#SBATCH --ntasks=number
Total number of tasks to be allocated. By default each task has 1 cpu.
#SBATCH --ntasks-per-node=number
Number of tasks per node. Total being this number multiplyed by the number of nodes. Max either 28 or 40 depending on partition.
#SBATCH --cpus-per-task=number
Number of CPU per task. Default is 1.
#SBATCH --mem=value_in_MB
Maximum memory per node. Default is either 128000 or 96000 MB, depending on partition
#SBATCH --output=file_name
Name of the file to store output in.
#SBATCH --error=file_name
Name of the file for storing errors
#SBATCH --mail-type=event
Send an email when certain events occur. Valid events: NONE, BEGIN, END, FAIL, REQUEUE, ALL
#SBATCH --mail-user=mail-address
User email address to send messages to
#SBATCH --job-name=name
Job name
See available resources on partitions (queues)
sinfo_t_idle - a linux wrapper command to show a list of partitions on the cluster and idle nodes on it
An example of the output of such a command will be:
Here you can see how many nodes are idle (free) on each partition (queue) and ready for immediate use.
List user's submitted jobs
squeue - displays information about user's specific active, pending and/or recently completed jobs
squeue -l will give you a more detailed information.
Job information
scontrol show job <JOBID> displays job's state information and diagnostic output for jobs with Id, JOBID
JOBID you'll get when you submit a job with sbatch or from squeue information table
To get more detailed output you can use -d option, such as for example if JOBID is 8888888, to get the detailed data do:
scontol -d show job 8888888
Cancel jobs
scancel <JOBID> will cancel jobs with Id, JOBID.
scancel -t <STATE> will cancel all the jobs in a certain STATE. It can be PENDING, RUNNING or SUSPENDED
Chain jobs
Some jobs require more time to finish than the maximum walltime a single job is allowed to run. As a solution it is possible to run multiple jobs in a chain, meaning next job will start only if the previous one is completed.
-d, --dependency=<dependency_list> is an option for sbatch command that deffer the start of this job until the specified dependencies have been satisfied / completed.
<dependency_list> is of the form <type:job_id[:job_id][,type:job_id[:job_id]]> or <type:job_id[:job_id][?type:job_id[:job_id]]>. All dependencies must be satisfied if ',' separator is used. And any dependency must be satisfied if '?' separator is used. Once a job dependency fails due to the termination state of preceding job, the depending job will never run.
Some useful dependency types to use in <dependency_list>:
Dependency
Purpose
after:job_id[[+time][:job_id[+time]...]]
After the specified jobs start or are canceled and 'time' in minutes from job start or cancelation happens, this job can begin execution. If no 'time' is given then there is no delay after start or cancelation.
afterany:job_id[:job_id...]
This job can start after specified jobs are over.
afternotok:job_id[:job_id...]
This job can start after specified jobs have terminated in some failed state. Ex: node failure, non-zero exit code, time out etc.
afterok:job_id[:job_id...]
This job can start after specified jobs executed successfully. Ex: completed with exit code of zero
Knowing that a job submited with sbatch will output the following string:
Submitted batch job JOB_ID
It is possible to cut the string to get job ID into a variable named job_id with the following submit command, where hello.sh is the name of the job script you want to run:
Now you can run a while loop in a bash script to submit multiple chain jobs:
#!/usr/bin/env bash
job_sbatch_script="hello.sh"
declare -i nr_of_jobs="5" # how many chain jobs you want to run
dependency_type="-d afterok"
declare -i loop_counter="1" while [[ ${loop_counter} -le ${nr_of_jobs} ]]; do if [[ ${loop_counter} -eq 1 ]]; then sbatch_options="" else sbatch_options="${dependency_type}:${job_id}" fi
Licenses on bwUniCluster 2.0 for users from Hochschule Esslingen.
Licenses for commercial software like ANSYS, or STAR-CCM+ for users from Esslingen University of Applied Sciences (HE), that a managed by a local license server, are not openly available on platforms other than the university handled ones.
bwUniCluster being a HPC resource platform opened for users from different universities from Baden-Württemberg, does not have direct access to the license servers from HE.
Nonetheless, reaching the HE license servers resources is possible through SSH-tunneling.
Access and configuration over an SSH-tunnel.
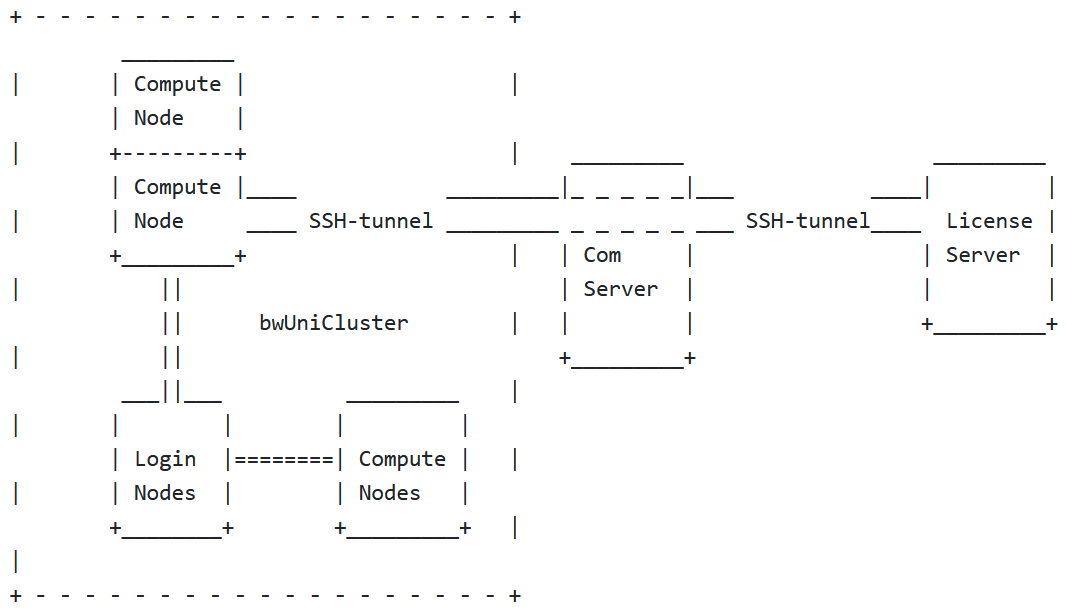
A SSH tunnel (also called SSH port forwarding) allows data exchange between bwUniCluster's specific nodes and a license server through an intermediate server/PC which has an SSH encrypted connection with bwUniCluster. (See the diagram below)
In other words, you need a server or PC which can be accessed from bwUniCluster through SSH and is connected to the license server.
For HE users such, a server is comserver.hs-esslingen.de
So, in order to create any SSH tunnel from the cluster nodes to the license server you must first ensure that a valid connection exists from the bwUniCluster to the com server and it can be passwordless accessed through SSH key authentication.
Configure SSH key based secure authentication from bwUniCluster to the intermediate (com) server.
Create a SSH public key. If you don't have a SSH public key on bwUniCluster, create one with
ssh-keygen -t ed25519
Follow and fill the requested options. At the end you should have the following file created:
$HOME/.ssh/id_ed25519.pub
Authorize SSH key authentication from bwUniCluster to HE comserver. After you created the SSH public key. Run the following command from bwUniCluster:
where, <USER_ID> is the HE user ID, and <COM_HOSTNAME> is the intermediate server host name. In our case it is comserver.hs-esslingen.de You'll be asked to provide the HE password for authentication on comserver.hs-esslingen.de. To verify if the SSH key based secure authentication have been successfully established, you may run the following command from bwUniCluster:
ssh <USER_ID>@<COM_HOSTNAME>
If you get an SSH window of the <COM_HOSTNAME>, without being asked for any password, you configured your SSH key based connection successfully. Congratulations.
Creating a SSH tunnel.
Having access to the intermediate server with the host name <COM_HOSTNAME>, user id <USER_ID>
Knowing that the intermediate server can connect to the license server with host name <LCS_HOSTNAME>, through port <LCS_PORT>
It is possible to create an SSH tunnel through a free port <LOCAL_PORT>, with the following command:
Reaching HE ANSYS license servers from bwUniCluster over a SSH tunnel.
ANSYS packages are connected to university's FLEXlm servers through two ports: 1055 and 2325.
Besides these 2 ports, an extra port, required by the FLEXlm daemon, should be tunneled as well. In the example below we named it DAEMON_PORT and set it to an arbitrary port, 49100.
This port is either random or, usually configured by the license servers administrator. Later in the scripts it will be referred with a placeholder <DAEMON_PORT>
The following command will create an SSH master control socket with the respective ports tunneled through the comserver.hs-esslingen.de:
Useful: SSH-Tunnel will need a passwordless connection from the cluster to the comserver.hs-esslingen.de through a SSH-key.
ANSYS Fluent sbatch job using HE managed licenses.
As you may know from, bwUniCluster 2 Slurm common features, in order to start a job on the cluster you will need to send a specific batch script to sbatch Linux application.
Below, you may consult a sample of a script which will start a FLUENT job on bwUniCluster, using ANSYS v.2020R2, a single node, 28 processors.
The job will be using Esslingen's university ANSYS license manager, with the host name lizenz-ansys.hs-esslingen.de.
Note: Value placeholders in the script will be:
HE user ID - <USER_ID>
FLEXlm Daemon Port - <D_PORT>
FLEXlm DAEMON_PORT variable will be
#!/bin/bash # Allocate one node #SBATCH --nodes=1 # Number of program instances to be executed #SBATCH --ntasks-per-node=28 # Queue class wiki.bwhpc.de/e/BwUniCluster_2.0_Batch_Queues #SBATCH --partition=single # Maximum run time of job #SBATCH --time=2:00:00 # Give job a reasonable name #SBATCH --job-name=fluent-test # File name for standard output (%j will be replaced by job id) #SBATCH --output=fluent-test-%j.out # File name for error output #SBATCH --error=fluent-test-%j.out # send an e-mail when a job begins, aborts or ends #SBATCH --mail-type=ALL # e-mail address specification #SBATCH --mail-user=<USER_ID>@hs-esslingen.de
echo "Starting at " date
# load the software package module load cae/ansys/2022R2_no_license
CFX sbatch job on a single node using HE managed licenses.
The script below, will start a CFX5 job on bwUniCluster, using ANSYS v.19.2, on 40 processors of a single node.
This script can also be downloaded clicking the liks in the page footer.
The job in an CFX5 def file named cfx_example.def will be using Esslingen's university ANSYS license manager, with the host name lizenz-ansys.hs-esslingen.de.
Note: Value placeholders in the script will be:
HE user ID - <USER_ID>
FLEXlm Daemon Port - <D_PORT>
FLEXlm DAEMON_PORT variable will be
#!/bin/bash
# Allocate one node #SBATCH --nodes=1 # Number of program instances to be executed #SBATCH --ntasks-per-node=40 # Queue class wiki.bwhpc.de/e/BwUniCluster_2.0_Batch_Queues #SBATCH --partition=single # Maximum run time of job #SBATCH --time=8:00:00 # Give job a reasonable name #SBATCH --job-name=cfx5-job # File name for standard output (%j will be replaced by job id) #SBATCH --output=cfx-test-%j.out # File name for error output #SBATCH --error=cfx-test-%j.out # send an e-mail when a job begins, aborts or ends #SBATCH --mail-type=ALL # e-mail address specification #SBATCH --mail-user=<USER_ID>@hs-esslingen.de
echo "Starting at " date
# load the software package module load cae/ansys/2022R2_no_license
CFX sbatch job on multiple nodes using HE managed licenses.
The script below, will start a CFX5 job on bwUniCluster, using ANSYS v.19.2, 4 nodes with 40 tasks each, totaling in 160 processors.
This script can also be downloaded clicking the liks in the page footer.
The job in an CFX5 def file named cfx_example.def will be using Esslingen's university ANSYS license manager, with the host name lizenz-ansys.hs-esslingen.de.
Note: Value placeholders in the script will be:
HE user ID - <USER_ID>
FLEXlm Daemon Port - <D_PORT>
Note: You will also have to load system/ssh_wrapper/0.1 to allow cfx5solve node-communication over ssh.
#!/bin/bash # Allocate one node #SBATCH --nodes=4 # Number of program instances to be executed #SBATCH --ntasks-per-node=40 # Queue class wiki.bwhpc.de/e/BwUniCluster_2.0_Batch_Queues #SBATCH --partition=multiple # Maximum run time of job #SBATCH --time=8:00:00 # Give job a reasonable name #SBATCH --job-name=cfx5-job # File name for standard output (%j will be replaced by job id) #SBATCH --output=cfx-test-%j.out # File name for error output #SBATCH --error=cfx-test-%j.out # send an e-mail when a job begins, aborts or ends #SBATCH --mail-type=ALL # e-mail address specification #SBATCH --mail-user=<USER_ID>@hs-esslingen.de
CD-adapco, the company behind STAR-CCM+ offers, cheap or free of charge licenses for academical projects.
These licenses are managed by CD-adapco own license manager and can be used on demand by the user owning a STAR-CCM+ POD-key.
The license server is already connected to bwUniCluster and any user can run jobs pointing the software to it (flex.cd-adapco.com), and the POD-key.
To start a STAR-CCM+ job on bwUniCluster, you'll have to send a sbatch script, to sbatch application.
As the STAR-CCM+ license server in HE is managing all the licenses in the university, including the ones in the PC-pools, you risk to block any STAR-CCM+ calculation made in "house" at the university, as the total number of licenses is limited, and using some of them for HPC jobs will put all the other machines at the university in a license queue, waiting for the HPC job to finish.
A video tutorial on how to submit a STAR-CCM+ Job on bwUniCluster with licenses from the university server over a SSH tunnel
Your browser does not support the video tag.
It's a basic example with some voice explanations of how to submit a STAR-CCM+ job and what are all those lines and words in a submit script used for. More data and examples you can of course find in text form on this page.
Running a STAR-CCM+ Job on a Single Node with a POD-Key License
Description: Learn how to efficiently run a STAR-CCM+ job on a single node with a POD-key license. This guide provides a batch script and step-by-step instructions to execute the job, utilizing 40 processors and STAR-CCM+ v.2021.3.
Optimizing the usage of computing resources is crucial for executing STAR-CCM+ simulations effectively. Running a job on a single node with a POD-key license offers a streamlined approach for specific tasks.
Batch Script. The provided batch script enables you to initiate the STAR-CCM+ job on a single node, leveraging the power of 40 processors and utilizing the POD-key license seamlessly.
Note: Assuming the job is started by an Esslingen user with the following keyholders:
HE User ID - <HE_USER_ID>
POD key - a string instead of <POD_KEY>
#!/bin/bash # Allocate one node #SBATCH --nodes=1 # Number of program instances to be executed #SBATCH --ntasks=40 # Queue class wiki.bwhpc.de/e/BwUniCluster_2.0_Batch_Queues #SBATCH --partition=single # Maximum run time of job #SBATCH --time=4:00:00 # Give job a reasonable name #SBATCH --job-name=starccm-single # File name for standard output (%j will be replaced by job id) #SBATCH --output=logs-%j.out # File name for error output #SBATCH --error=logs-%j.out # send an e-mail when a job begins, aborts or ends #SBATCH --mail-type=ALL # e-mail address specification #SBATCH --mail-user=<HE_USER_ID>@hs-esslingen.de
echo "Starting at " date
# specify the STAR-CCM+ version to load (available on the cluster) VERSION="2021.3"
# specify sim case file name INPUT="test_case.sim"
# specify java macro file name if any JAVA_FILE=""
# load the available STAR-CCM+ module module load cae/starccm+/${VERSION}
# calculate number of nodes np=${SLURM_NTASKS} echo "number of nodes: $np"
# set license variables: server address and POD key string export CDLMD_LICENSE_FILE=1999@flex.cd-adapco.com export LM_PROJECT=<POD_KEY>
Running a STAR-CCM+ Job on Multi-Nodes with a POD-Key License
Description: Discover how to execute a parallel STAR-CCM+ job across multiple nodes with a POD-key license. This guide provides a batch script and step-by-step instructions to run the job on 4 nodes, each equipped with 40 processors, totaling 160 tasks. The STAR-CCM+ version used is v.2021.3.
Running STAR-CCM+ jobs on multi-nodes with a POD-key license is an efficient way to utilize computing resources and achieve faster simulations.
Batch Script. The provided batch script will initiate the STAR-CCM+ job on 4 nodes, with each node having 40 processors, summing up to 160 tasks. The script utilizes the POD-key license for seamless access.
Note: Assuming the job is started by an Esslingen user with the following keyholders:
HE User ID - <HE_USER_ID>
POD key - a string instead of <POD_KEY>
#!/bin/bash # Allocate nodes #SBATCH --nodes=4 # Number of program instances to be executed #SBATCH --ntasks-per-node=40 # Queue class wiki.bwhpc.de/e/BwUniCluster_2.0_Batch_Queues #SBATCH --partition=multiple # Maximum run time of job #SBATCH --time=4:00:00 # Give job a reasonable name #SBATCH --job-name=starccm-multi # File name for standard output (%j will be replaced by job id) #SBATCH --output=logs-%j.out # File name for error output #SBATCH --error=logs-%j.out # send an e-mail when a job begins, aborts or ends #SBATCH --mail-type=ALL # e-mail address specification #SBATCH --mail-user=<HE_USER_ID>@hs-esslingen.de
echo "Starting at " date
# specify the STAR-CCM+ version to load (available on the cluster) VERSION="2021.3"
# specify sim case file name INPUT="test_case.sim"
# specify java macro file name if any JAVA_FILE=""
# create machinefile machinefile=hosts.star scontrol show hostname ${SLURM_JOB_NODELIST} > ${machinefile}
# load the available STAR-CCM+ module module load cae/starccm+/${VERSION}
# calculate number of nodes np=${SLURM_NTASKS} echo "number of procs: $np"
# set license variables: server address and POD key string export CDLMD_LICENSE_FILE=1999@flex.cd-adapco.com export LM_PROJECT=<POD_KEY>
To view which OpenFOAM modules are available on the cluster, run the following command:
$ module avail cae/openfoam
or:
$ module spider cae/openfoam
To load the appropriate version (if available), run:
$ module load cae/openfoam/<VERSION>
where <VERSION> is the desired available OpenFOAM version to load.
After the module is loaded, OpenFOAM needs to be activated by running following:
$ source $FOAM_INIT
or simply:
$ foamInit
Parallel processing with OpenFOAM
To run any job in a parallel mode with OpenFOAM, the geometry domain should be decomposed into segments, equal to the number of processors you intend to use. That means, for example, a mesh of a case which will run on 8 processors, must first be decomposed into 8 segments. Then the solver is run in parallel mode, concurrently on these 8 segments, each processor responding for one segment of the mesh, sharing the data with all other processors in between. There is a built in mechanism which properly connects the generated data on each segment to avoid the possible errors.
Mesh decomposition is handled by decomposePar utility. The number of parts to decompose the geometry domain as well as the method to do so is defined in system/decomposeParDict file, in your OpenFOAM case folder.
Specific domain decomposition and reconstruct on bwUniCluster 2
Every node on bwUniCluster 2 has it's own SSD hardrive which if used will run havy data exchange aplications faster. OpenFOAM will profit using these local harddrives for parallel data processing.
For this purpuse some specific wrappers are developed for bwUniCluster 2 to move data on nodes local hardrives after domain decomposition and collect it back before reconstruct. Using following commands:
instead of decomposePar
decomposeParHPC
instead of reconstructPar
reconstructParHPC
instead of reconstructParMesh
reconstructParMeshHPC
Walk-through on how to submit and run an OpenFOAM job on bwUniCluster
OpenFOAM job scripts
Attention: OpenFOAM module loads automatically the necessary MPI and Compiler.
A job script to submit a sbatch job called openfoam.sh which builds a mesh with blockMesh, and snappyHexMesh in parallel, then checks it also in parallel with checkMesh, runs the solver specified in system/controlDict on 2 nodes, with 40 tasks each, totalling in 80 processors, is shown bellow and also available for download. (See the end of the page)
#!/bin/bash
# Allocate nodes #SBATCH --nodes=2 # Number of program instances to be executed #SBATCH --ntasks-per-node=40 # Queue class wiki.bwhpc.de/e/BwUniCluster_2.0_Batch_Queues #SBATCH --partition=multiple # Maximum run time of job #SBATCH --time=4:00:00 # Give job a reasonable name #SBATCH --job-name=openfoam # File name for standard output (%j will be replaced by job id) #SBATCH --output=logs-%j.out # File name for error output #SBATCH --error=logs-%j.out # send an e-mail when a job begins, aborts or ends #SBATCH --mail-type=ALL # e-mail address specification #SBATCH --mail-user=<HE_USER_ID>@hs-esslingen.de
# Initialize the job FOAM_VERSION="7" MPIRUN_OPTIONS="--bind-to core --map-by core -report-bindings"
Remote visualisation through OpenGL and X11 Linux 3D graphics stack has several drawbacks:
Rendering is done on the client, not server
Not all OpenGL extensions are supported via client rendering
Network is clogged as the model must always be transferred from the server to the client
Bad interactivity due to constant loops in the X11 protocol
Compatibility problems
On bwUniCluster a Virtual Network Computing (VNC) desktop is provided to avoid these drawbacks. Further (original) information you can find on the bwUniCluster wiki pages.
Start VNC server on the cluster
To use any visualisation software via a VNC on bwUniCluster, first you'll have to open a VNC session in the cluster.
start_vnc_desktop is a batch script which can be used on login nodes to automatically:
allocate resources for the VNC server
start the VNC server on the allocated resources
start_vnc_desktop options:
Get some info on how to use the command:
start_vnc_desktop --help
To start a VNC server without any 3D rendering support, do:
start_vnc_desktop --queue [myQueue]
On limited number of nodes you can use hardware rendering, with:
Use sinfo_t_idle for checking the queues and their idle nodes.
By using the option --walltime hh:mm:ss the duration of the vnc-job could be specified.
After the vnc_server has started on an cluster node, you will see the follwoing information on the screen.
Use a VNC client on your local desktop
Any VNC client can be used to connect to the server, although TurboVNC is strongly recommended as it has been tested and is compatible with various OSes
Linux:
Once you have your VNC client installed and you start the server, you'll be provided with a command line to start your viewer from the terminal.
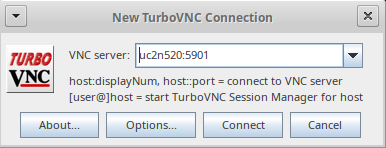
Or you can use the data provided after you start the server to open your session with VNC viewer GUI.
Specify the VNC server.
Click on Options and specify on the Security tab the Options for the Gateway. Note: Your GUI must have the "Gateway" selection in your "Options" - "Security" tab.
Windows:
Specify the VNC server and the Security Options in the same way as described for TurboVNC-GUI under Linux (see above).
Download and install latest TurboVNC version for your system.
Execute Java TurboVNCviewer, not just TurboVNCviewer as it will not provide you with the option to set the "Gateway"
If you get the error: "Windows cannot find 'jawaw.exe'. Make sure you typed the name correctly...":
Make sure Java Runtime Environment (JRE) is installed on your machine
JRE 'bin' path is provided in "System Properties":
open 'sysdm.cpl' in Win + R window;
go to 'Advanced' -> 'Environment Variables...',
Add to 'Path' variable you JRE bin folder. Example: C:\Program Files\Java\jre12\bin
Open your application in the provided virtual machine window
Once the new VNC interface is loaded you get a Linux RedHat desktop, in which you can:
open a 'Konsole' or 'Terminal'
load your software module. For example:
module load cae/paraview/5.6.0
start you application. Example:
paraview
Close the VNC session
As the work is over you can close the VNC server connection with Ctrl+D from the node window on the cluster that was automatically opened for you.
Jupyter on bwUniCluster 2.0
Zugriff
Um zu sehen, welche Jupyter Module auf dem Cluster verfügbar sind, führen Sie den folgenden Befehl aus:
$ module avail jupyter
Um Jupyter auf den HPC-Ressourcen des SCC nutzen zu können, gelten die Zugangsvoraussetzungen für bwUniCluster 2.0. Eine Registrierung ist erforderlich. Bitte beachten Sie, dass Sie die Registrierung abgeschlossen und Ihren Login einmal mit Secure Shell (ssh) getestet haben sollten.
Für die Anmeldung am Jupyter Hub werden Ihr Benutzername, Ihr Passwort und eine 2-Faktor-Authentifizierung benötigt.
Sollte die maximal wählbare Zeit von 4 Stunden von JupyterHub nicht ausreichen, kann auch eine interaktive Sitzung auf den Compute Nodes gestartet werden (Befehl salloc). Innerhalb der interaktiven Sitzung muss dann das entsprechende Jupyter Modul mit dem Befehl module load geladen werden.